
Rise of the Drow Cathedral Survival Guide
The most common question we hear from GMs running Rise of the Drow: Collector’s Edition is: “How do you handle the Rise of the Drow cathedral encounter?”
“Is the cathedral really supposed to be this hard?”
Yes—it absolutely is. The Rise of the Drow cathedral encounter in the first chapter of the prologue, The Darkness Arrives, is intentionally intense. It’s designed to challenge your players, test their creativity, and set the tone for the grim, high-stakes world of the Underworld. But that doesn’t mean it should lead to a total party kill—unless that’s the game your group wants to play!
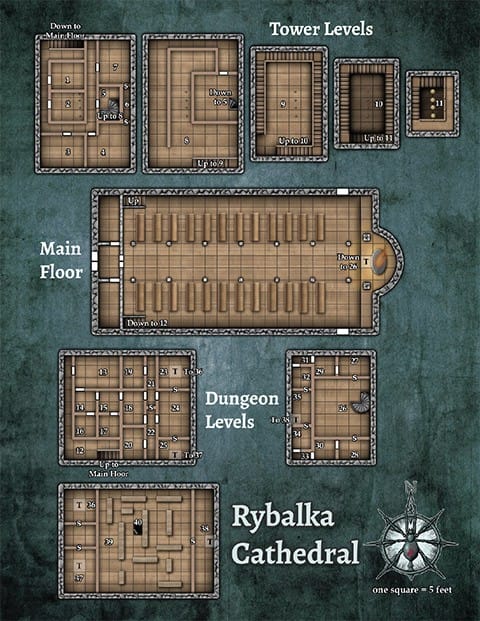
In this post, we walk through the Rise of the Drow cathedral encounter, breaking it into three phases: The Main Hall, The Bell Tower, and The Reliquary. Each section includes tactical GM advice to help your party survive—while still keeping them on the edge of defeat.
🚨 Spoilers ahead for Rise of the Drow: Collector’s Edition.
The Rise of the Drow Cathedral: What’s at Stake?
The prologue is designed to be deadly. The Darkness Arrives introduces the drow as a highly tactical, organized threat—not just monsters in a dungeon. The cathedral is ground zero for their assault on Rybalka, and everything from the pacing to the enemy placement is meant to leave your players feeling overwhelmed. But with smart adjustments and narrative flexibility, GMs can help guide their players to victory—barely.
Phase 1: The Main Hall
The cathedral’s nave throws your players into chaos from the first round. Wounded adventurers, crazed villagers, and the dark lantern archon make this a fast-paced, brutal opener.
Reduce the Difficulty Without Reducing the Threat
If your party has burned through resources or suffered losses in earlier fights, feel free to:
- Halve the archon’s hit points
- Have it attack NPCs every other round
- Use a custom mechanic where it reverts to a friendly form after dropping to half HP
On our Discord server, a GM shared how their archon reverted to its normal form and blessed the party with an aid spell—a fantastic example of keeping tension high while rewarding survival.
Use the NPCs to Support, Not Steal the Scene
You’ve got allies at your disposal:
- The Gryphonwind’s Gatherers can become alternate PCs, flankers, or damage soakers.
- Mayor Leonid or Juriendor can lend support, then retreat, showing the gravity of the situation without overshadowing the players.
Phase 2: The Bell Tower
Now bruised and bloodied, the players ascend to the bell tower—a vertical battlefield with storm crows and mephits. The terrain works against them, and the enemies can hit and fly.
Let the World Help Them
- The Acolyte: He can heal wounded characters or direct them to Juriendor’s Armory. Encourage your players to take what they need!
- Juriendor’s Armory: Don’t rely on looting mid-fight. Have a potion roll free from a shelf, or an NPC shout, “Grab that wand!” to emphasize available resources.
Use the Enemies’ Objectives
The mephits aren’t focused on the party—they’re trying to burn the tower. Let the party spot this, giving them a reason to split up or act tactically.
Bellropes: Improvise Your Allies
The bellropes can lash out, trip enemies, or offer swing points. Let your players get creative. Reward successful rolls with minor environmental advantages.

Phase 3: The Reliquary
By the time they reach the cathedral tombs, the party is likely drained. This part of the Rise of the Drow cathedral can feel like a death march—unless you manage the pacing carefully.
Break Up the Encounters
Don’t overwhelm players with back-to-back combat. Instead:
- Let skeletons be bound to specific areas
- Keep ghoulblins waiting in ambush only under very specific triggers
- Make it clear that some enemies are guarding, not patrolling
Bring in Juriendor (If Needed)
The high priest’s appearance can save the day—without handing the players a win. Options include:
- Juriendor provides healing and retreats
- He’s locked in a losing battle with the tunnel spider, prompting a dramatic rescue
- He reveals a secret door or item cache
A Perfect Ending Isn’t a Victory
A flawless win isn’t the goal. The drow planned this strike to wear down their enemies and escape unseen. If your players finish the cathedral battered and desperate, they’ve succeeded. The sense of threat should linger even after the final fight.
Let them realize: this wasn’t a random attack. It was a coordinated invasion—and they’ve only survived the first strike.
Bonus Tips
- Start the campaign at Level 2, or run an A-series adventure first.
- Hand out potions, scrolls, or blessings as environmental rewards, not loot.
- Include small tactical choices with meaningful impact: a choice to chase vs. heal, climb vs. defend, etc.
📎 Useful Links
✍️ Final Thoughts
The Rise of the Drow cathedral encounter is a masterclass in tension, pacing, and high-stakes storytelling. With smart play and creative thinking, even a fragile 1st-level party can overcome the odds. Let the players feel the weight of every choice—and reward them with a deeper connection to the world they’re trying to save.
Got tips for surviving the cathedral? Or questions about running it? Drop us a comment or join the discussion on Discord!
Darkness Rises, and the Time is Now…
Align with House AAW and be the first to uncover new quests, ancient powers, and revelations from the Underworld.